
For all of my photos, I shoot in raw and use Lightroom and Photoshop for my editing. Way back in the day, when I had my first "real" camera, a Canon Rebel, the first editing program that I used was an online site called Picnik. Does anyone else remember when Picnik was around? When I was recently given the opportunity to review a new online photo editing site, Fotor, I was pleasantly surprised to find that is it basically the new and improved Picnik!
.
Fotor.com is a great, free, easy to use online site for editing photos! It features all kinds of basic editing adjustments to play around with as well as curves and even "beauty" adjustments such as skin softening. I highly recommend checking out Fotor if you are a new photographer or someone who isn't really interested in pursuing professional photography but would like to better your photos! I feel like starting out in Picnik all of those years ago introduced me to the fundamentals of editing so that when I first started using Lightroom I already had a little bit of a grasp on my own unique editing "style".
.
Another great feature of fotor.com is the collage feature! I have to admit, I have wanted to make a circular sidebar photo for a while now but just haven't put in the time to do it! Surprisingly, when I went to browse Pinterest, I didn't feel like there were a whole lot of great tutorials out there for creating a circular photo! I've never done a tutorial before but I'd love to share how I was able to quickly and easily make a circular photo for my sidebar using Fotor's collage feature!
.
Okay, once you are on the editing page at Fotor, click on the photo collage tab on the top. Or click here to take you directly to Fotor's collage page! It will ask you to update your photo first on the far right hand side. Click on "add photo" and then choose "computer" to select a file. Once your photo is uploaded, it is time to choose a template!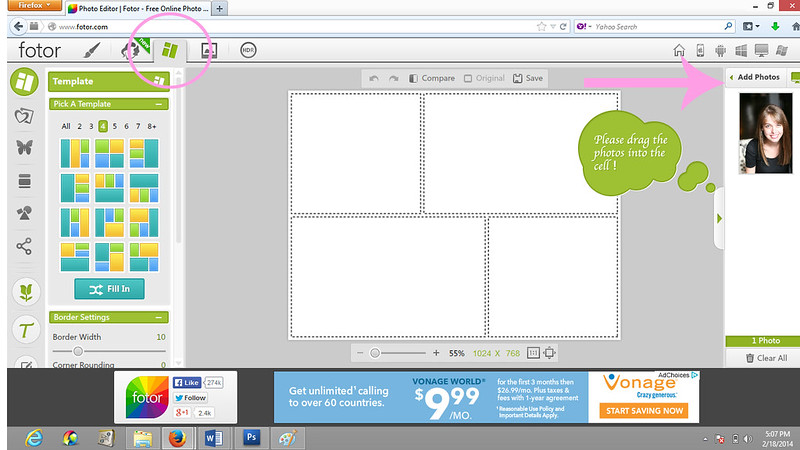
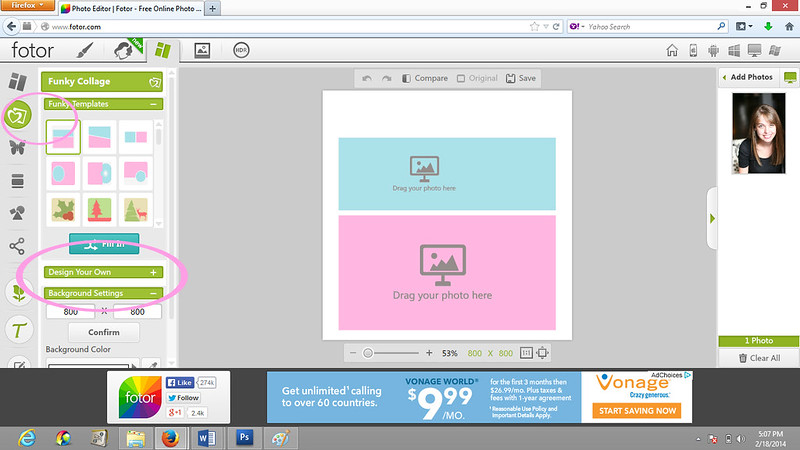
Fotor offers a lot of great pre-made templates, but to find the basic circle template that I needed I chose the second tab down from the top on the far left hand side. (It is pictured as a heart in front of a square.) Then, click on "design your own".
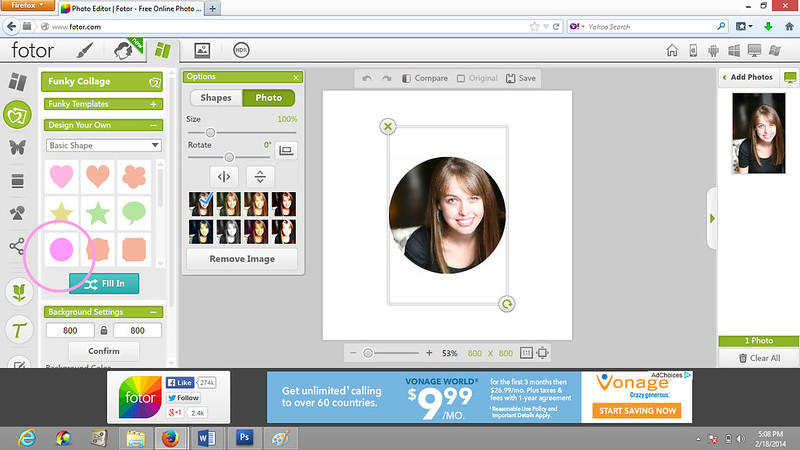
Choose the circle shape from the basic shape category. Then, drag the photo that you have uploaded from the box on the right hand side of the screen and drop it into the circle template in the middle of the screen.
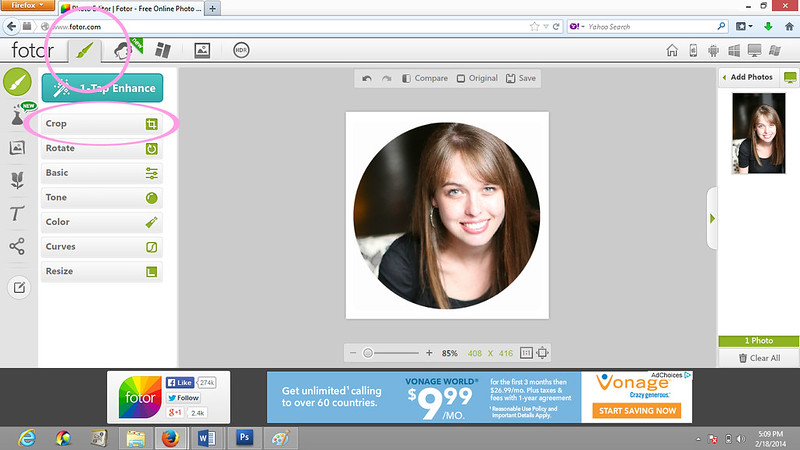
Alright, now we need to get rid of all that white space around the photo. To do this, click on the first tab on the top of the screen that looks like a paintbrush. (Note: each time you click to a different screen, a pop up will ask if you want to apply or discard your progress; click "apply" to save what you have done so far and move on to the next step.) Now click "crop" and make sure you check the "keep proportions" box. This will ensure that your crop is going to stay a perfect square. Cut your crop pretty close to the circular photo, leaving a little space around it. Click "apply" to complete the crop.
The last step in getting your photo ready for your blog is to resize it. To do this, click "resize". Again, make sure you check "keep proportions." I resized my image to 200 x 200 pixels. This is a pretty standard size for a blog sidebar, but it will depend on the particular look that you are after. Click apply and your photo is ready to go!

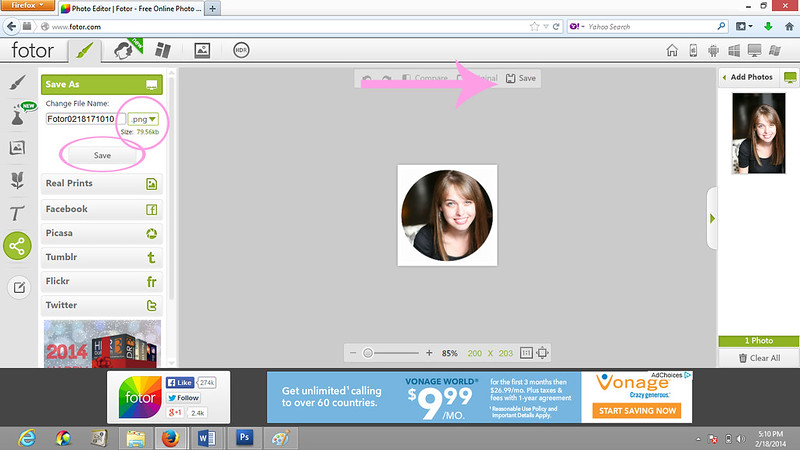
To save the finished photo to your computer - click the save button. Then on the left hand side, choose .png and click save! I always use a .png image vs. a .jpg image when I am adding something to my blog design. It comes out clean and crisp. Now your photo is ready to load onto your blog template! (Which could be a whole other tutorial itself!)
 .
.
I also love how you can add text on Fotor, choosing from TONS of free fonts as well as make cards! I know that Valentine's Day is over, but look at this cute Valentine's Day card that I put together using photos from one of my clients!

.
I hope you enjoyed the tutorial! Check out Fotor and let me know if you found anything worthwhile!
.
Are you following me yet on Pinterest?
Are you following me yet on Pinterest?
(I was compensated for sharing my opinions about this company. Thank you so much for supporting my family by reading!)
I think this would be great for someone who doesn't have editing software!
ReplyDeleteCool! I usually use picmonkey.com but I will have to try this!
ReplyDelete23D8E2A0AB
ReplyDeletekiralık hacker
hacker arıyorum
kiralık hacker
hacker arıyorum
belek